

Root Galaxy S2 I9100 on Official Android 4.1.2 XWLSH Jelly Bean Firmware [TUTORIAL]

Samsung recently released its latest official Jelly Bean update for Galaxy S2 I9100 users in Australia via Android 4.1.2 XWLSH firmware. The new firmware is now available for download over Samsung KIES as well as an Over-The-Air (OTA) update. S2 users, who missed the twin opportunities, can now download and install the same using our step-by-step guide posted here.
Nevertheless, those who have already upgraded their Galaxy S2 I9100 to the latest official firmware (through one of the aforementioned methods) can now root their device using the tutorial below. The rooting method employed in this tutorial uses Siyah Kernel root package with ODIN flash tool, which will automatically install ClockworkMod (CWM) recovery on the phone. Hence, one need not install any custom recovery tool separately.

NOTE: Rooting the device is essential to regain full system access (Super User access) and be able to install third-party root-based apps, custom ROMs and system tweaks. Verify if the phone is already rooted by downloading and installing Root Checker app from Google Play Store.
Key Points to Note
- Siyah Kernel Root Package and the instructions given in this guide are applicable to the international variant of Galaxy S2 I9100 model only and will not work on any other device. Verify the device's model number by navigating to Settings > About Phone.
- Make sure that the device is already running the latest Android 4.1.2 XWLSH Jelly Bean official firmware before proceeding with root procedure.
- Back up important data and settings on the phone by using one of the recommended custom recovery tools such as CWM or TWRP, as it creates a complete image of the existing phone setup.
- Ensure that the correct USB drivers are installed for Galaxy S2 I9100 on the computer (download USB drivers).
- Verify that the USB Debugging Mode is enabled on the phone by navigating to Settings > Developer Options (if the device is running on Android 4.0 or later) or go to Settings > Applications > Development (if the phone is running on Android 2.3 or earlier).
- Make sure that the phone has at least 85 percent battery charge.
- The instructions provided in this guide are meant for reference purpose only.IBTimes UK will not be held responsible if the device is damaged during or after the firmware installation. Users are advised to proceed at their own risk.
How to Root Galaxy S2 I9100 on Official Android 4.1.2 XWLSH Jelly Bean Firmware
Step 1 - Download Siyah Root Kernel I9100XWLSH for Galaxy S2 on the computer.
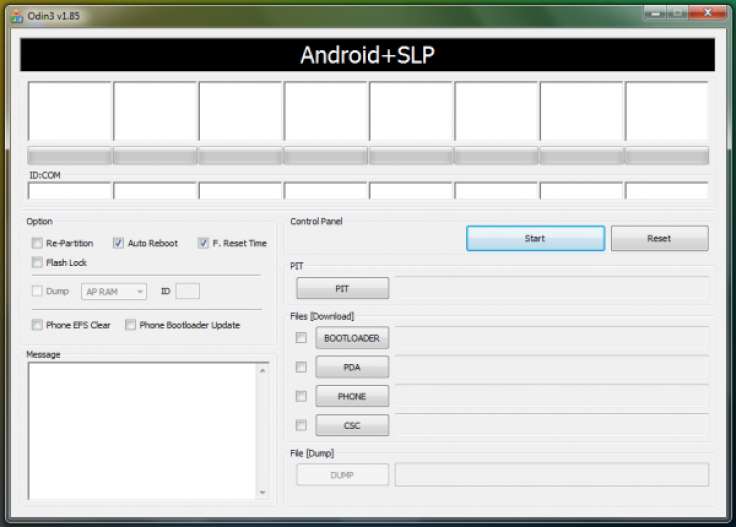
Step 2 - Download ODIN v1.85 which is necessary to root Galaxy S2 I9100 running on the latest Android 4.1.2 XWLSH official firmware.
Step 3 - Power off the phone and boot it into Download Mode. To do so, press and hold Volume Down and Home buttons together, and then tap the Power button until the construction Android robot icon with a triangle appears on screen. Hit the Power button again to confirm entry into Download Mode.
Step 4 - Launch ODIN on computer and connect the phone to it while the phone is still in Download Mode.
Step 5 - When the phone connects successfully, one of the ID: COM boxes indicates yellow with the corresponding COM port number. This process may be time consuming. So, please be patient.
Step 6 - Choose the file that must be flashed or installed on the phone, which can be found in the downloaded zip file in Step 1.
- Click the 'PDA' checkbox and choose the file 'Siyah-s2-v6.0b4.tar'.
Step 7 - In ODIN, enable Auto Reboot and F. Reset Time options.
Step 8 - Now hit Start button in ODIN and the firmware installation process will begin. It would take just a few minutes to complete.
Step 9 - Once the firmware installation is complete, the phone will reboot. When the home screen appears, just disconnect the phone from computer.
Samsung Galaxy S2 I9100 is now rooted on official Android 4.1.2 XWLSH Jelly Bean firmware. Check for the Superuser app in the phone's apps list to verify if root installation is successful.
[Source: Team Android]
© Copyright IBTimes 2024. All rights reserved.
-

Billionaire Declared Missing And Dead In 2018 Is 'Possibly Living In Moscow With Mistress'
-

Wendy's Sued For $20M After 11-Year-Old Gets Brain and Kidney Damage From 'Dirty Meal'
-

EU Sanctions Policy Is Attracting Growing Controversy
-

Russian Blogger Starved Son To Death By Only 'Feeding Him Sunlight' Instead Of Food


