

Google Nexus 4 Gets All-in-One Toolkit v1.1.0 to Root, Unlock, Flash And Many More
As soon as the Google's fourth generation Nexus-branded smartphone-Nexus 4 manufactured by LG hit the market, senior XDA developer, mskip released an All-In-One Toolkit v1.1.0 for the new handset. The Toolkit bundles an array of features allowing Nexus 4 users to perform backup, unlock, root, installation and many more without facing any difficulty.
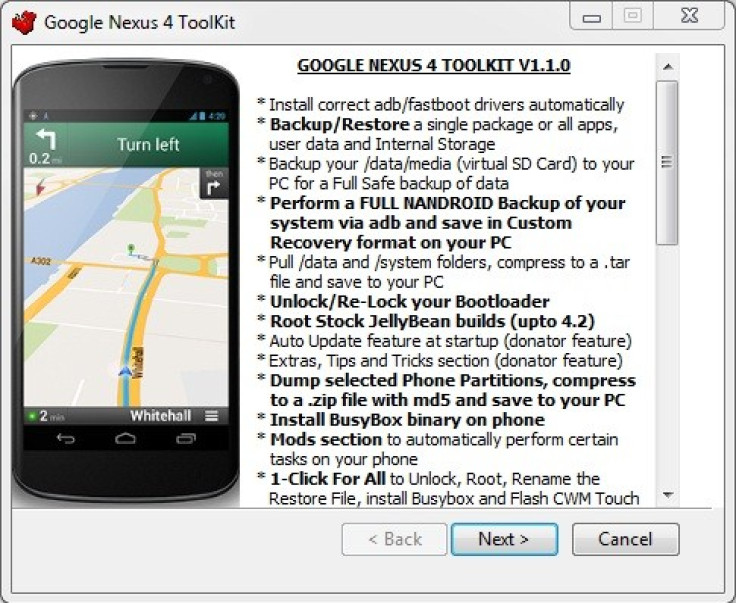
Features of Nexus 4 Toolkit v1.1.0
1) Install adb/fastboot drivers automatically on Windows xp/vista/7/8 32bit + 64bit
2) Backup/Restore a single package or all apps, user data and Internal Storage
3) Backup data/media (virtual SD card) to your PC for a full safe backup of data
4) Unlock/Re-lock Bootloader
5) Root stock Jelly Bean build (up to 4.2.0 JOP40C)
6) One-click for all to unlock, root, rename and restore file
7) Perform a complete Nandroid backup of the system (Boot, Cache, Data, Recovery and System) via adb and save in Custom Recovery format on your computer which can be restored through CWM Recovery
8) Pull/data and /system folders, compress to a .tar file and save to your PC
9) Dump selected phone partitions, compress to a .zip with md5 and save to your PC
10) Install BusyBox on your phone
11) Extras, Tips and Tricks selection available to all Toolkit donators
12) Auto update Toolkit to latest pushed version at startup
13) Programme up to 10 Quickpic slot and run them very quickly
14) Mods section to automatically perform certain tasks on your phone
15) Download Google stock image directly to correct Toolkit folder for extracting and flashing
16) Flash Custom Recovery or Google stock image to phone
17) Rename the Recovery restore file present on some stock ROMs
18) Boot into CWM Touch Recovery without flashing it
19) Boot or flash .img files directly from your PC
20) Install a single apk or multiple apk's to your phone
21) Push files from your PC to phone
22) Pull files from your phone to PC
23) Dump selected Logcat buffers to your PC
24) Dump BugReport to your PC
25) Set files permission on your phone
26) Open new Command Prompt for manual input
27) Reboot phone to Fastboot mode or Android from Fastboot mode
28) Reboot phone to Fastboot mode, Recovery, Android or Download mode from adb mode
Download the Google Nexus 4 Toolkit v1.1.0 from here.
Install ADB/Fastboot Drivers
In order to unlock the bootloader of your phone, root and perform other adb/fastboot functions, the first thing users need to do is to install the adb/fastboot drivers. The drivers can be installed through the Toolkit.
a) Those users who do not wish to use Toolkit to install the drivers then they can try PdaNet for Android, download and run the 32-bit Windows 7/Vista/XP or 64-bit Windows 7/Vista and follow the instructions to install.
b) Once the drivers are installed, unplug the USB cable and switch off your phone. Hold the Volume Up, Volume Down and the press the Power button to boot the phone into Fastboot mode.
c) Navigate to the Control Panel on your PC and open Device Manager. You can see either the Fastboot driver is installed or you can install it manually.
d) Connect the USB cable. In the Device Manager a new item called 'Android 1.0' should pop up and then the drivers should install automatically. Upon the competition of installation you will have a new section in the Device Manager named as Android Phone without an '!' which indicates it is installed correctly.
Ensure that you have enable USB Debugging in Settings, Developer Options before connecting the USB cable in ADB mode so that the PC will detect the phone.
Note: In case the driver does not install automatically then double click the Android 1.0 item then click on the driver tab and select 'Update driver.' Then select 'browse my computer' and go to the Google Nexus 4 Toolkitdriver folder. Ensure that the sub folders are ticked. Drivers should then be installed.
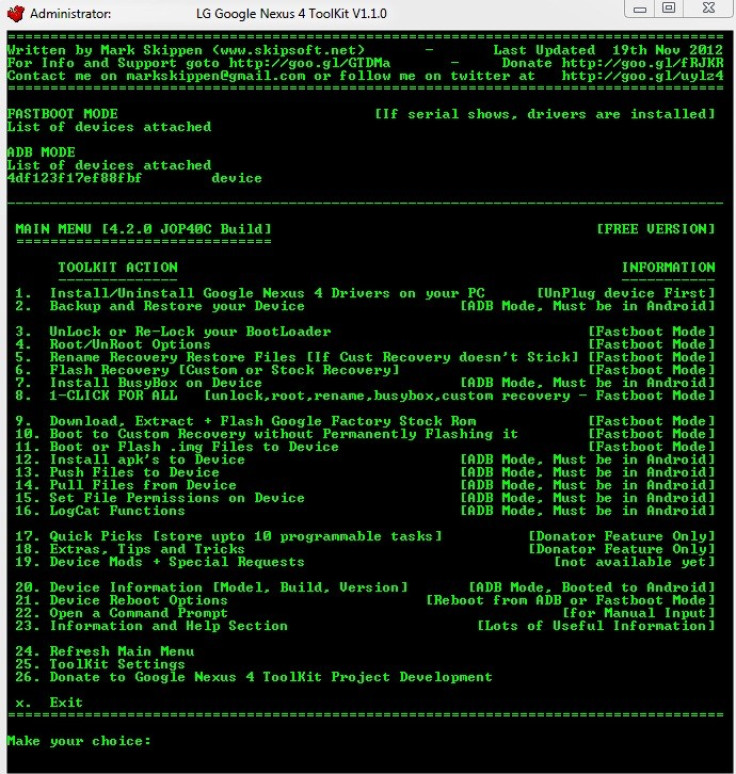
Using Mskip's Google Nexus 4 Toolkit
a) Download the Google Nexus 4 Toolkit package and run to install the Toolkit to your computer. This installation will create a shortcut on your desktop called Nexus 4 Toolkit. You can have the option to include or exclude the drivers files at installation so if you are already having your drivers set up and are just updating the Toolkit then you can always untick the drivers.
b) After the Toolkit is installed, double click on the 'Nexus 4 Toolkit' shortcut on your desktop to run it. You can run the Toolkit with your phone either in Adb or Fastboot mode.
c) Once you enter the main Menu you will get to see 'Fastboot Mode' and 'Adb Mode' at the top. You will see your phone's serial number under the mode you are in at the time provided you have installed your drivers correctly.
d) Each option has complete and detailed information.
e) When you wish to exit the Toolkit, then use the X option from the main menu since this will terminate the adb process and not leave it running in the background.
[Source: XDA]
© Copyright IBTimes 2024. All rights reserved.


