

How to fix low-audio volume on CyanogenMod and other custom ROMs


Android custom ROM users may experience loss of sound or reduced sound volume levels after installing a new ROM, which can now be fixed in simple steps, using ES File Explorer.
The only constraint is that the affected device must be rooted in order to use this fix for low-audio volume on CyanogenMod and other similar custom ROMs.
To fix this issue, we basically need to change the default audio settings in the system partition via root explorer app.
Steps to fix low-audio volume on CyanogenMod and other custom ROMs
Step 1: Download ES File Explorer from Google play store.
Step 2: Enable root explorer in the app as it is disabled by default (Open the ES File explorer > tap the icon at top left to open its menu > go to Tools heading, and search for Root Explorer option. Tap the toggle button to turn it ON. A pop-up message will appear, and then tap on Grant to enable root access.
Step 3: Then enable write access on system partition as follows:
In the app menu, tap on Root Explorer text to bring up further options. Now tap on Mount R/W, and then select /system as R/W. Hit OK to enable the write access to system.
Step 4: With system mounted in Read/Write (modification) mode, navigate to the folder: "/device/etc/sound". Find the file named "to3g" and tap on it, and then select to open the file as 'Text'.
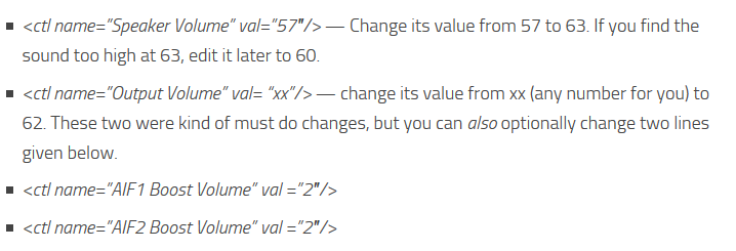
Step 5: Choose ES Note Editor as your app to open the text file, and then look for the following lines of code and change their value as specified below:
Step 6: Save the file and that should fix the issue.
Step 7: Open Root explorer settings again, and then select the Read Only (RO) option for /system to remove write access from system as it is no longer needed.
Step 8: Reboot the device to apply changes, and after the restart, you should get improved sound levels.
[Source: The Android Soul]
© Copyright IBTimes 2024. All rights reserved.


