

Nexus 7 3G Gets Android 4.2.1 Jelly Bean with Slim Bean Beta 1 ROM [How to Install]

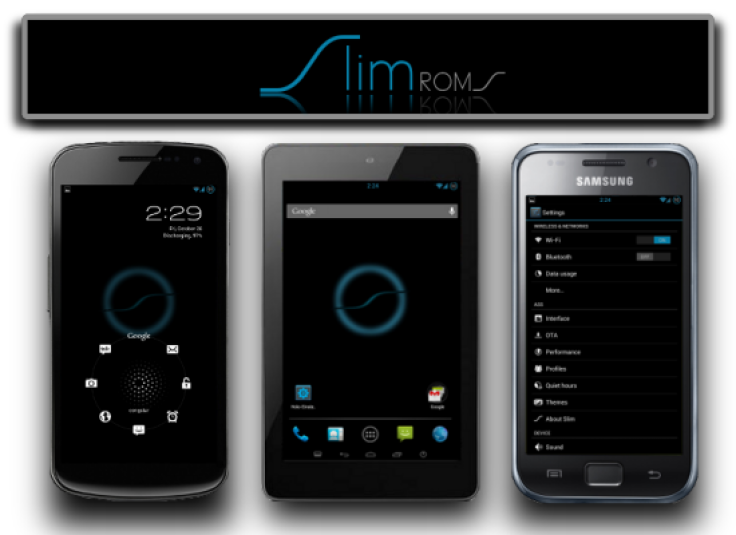
Nexus 7 3G users can now relish highly customisable features on the latest Android operating system, Android 4.2.1 Jelly Bean, with the release of Slim Bean Beta 1 ROM. The low-sized Jelly Bean custom ROM offers true Jelly Bean experience with a plethora of intuitive features such as multi-user support, gesture typing, new quick settings option, lock-screen widget, new camera app, photo sphere, improved Google Now, new daydream feature and miracast display.
NOTE: As the Slim Bean Beta 1 ROM is a nightly build that is still under development, it may harbour a few untested bugs and issues. These issues will be fixed in the upcoming updates as part of development progress. The Slim Bean ROM is known for its small file size and faster performance.
Slim Bean Android 4.2.1 Jelly Bean Beta 1 Features
- Dotted Battery Mod and color picker
- Battery bar mod
- Notification Background customisation
- Notification row transparency
- Quick Settings for
- Network mode tile
- Profile Tile
- Dismiss on toggle
- Updated APN + SPN
- Wifi name in notification drawer
- Power widget
- Device Parts
- Performance Settings (need to tap build number a few times)
- Cursor control using volume keys
- Disable full screen keyboard
- Alternate app chooser
- Clock styles and color chooser
- ADB over Wi-Fi
- Camera power shutter mod
- Wi-Fi country specific settings
- Notification IME selector
- SMS quick reply & mark as read from notification
- All MMS features
- All Contacts features
Key Points to Note
- Slim Bean Beta 1 ROM and the instructions provided in this guide are applicable to the Nexus 7 3G model only. It will not work on any other device. Verify your device's model number by navigating to Settings > About Tablet.
- IBTimes UK advises users to back up apps, important data and settings to avoid data loss while flashing the Slim Bean Beta 1 ROM on the Nexus 7 3G.
- Verify that your tablet has at least 80 percent battery power to prevent unexpected device shutdown (due to battery drain) while installing the Android 4.2.1 Jelly Bean update.
- Ensure that the correct USB drivers are installed for Asus Nexus 7 3G on your computer (download USB drivers)
- Make sure that your Nexus 7 tablet's bootloader is unlocked. Also, verify that the device is rooted with ClockworkMod Recovery (CWM) installed.
- Enable USB Debugging mode on the tablet by navigating to Settings > Applications > Development
- The instructions given in this guide are meant for reference purpose only and do not cover any warranty claims involving device damage or issues arising out of using the Slim Bean Beta 1 Jelly Bean ROM on the Nexus 7
Downloads
Download Android 4.2.1 Slim Bean Beta 1 Jelly Bean ROM for Google Nexus 7 3G
Download Google Apps (GApps)
How to Install Android 4.2.1 Jelly Bean on Google Nexus 7 3G with Slim Bean Beta 1 ROM
1. Connect your Nexus 7 tablet to computer with original USB cable.
2. Copy downloaded files to the root folder on your phone's SD card. Important: Do not extract any files.
3. Disconnect USB cable from computer and then power off your tablet.
4. Boot into ClockworkMod recovery by pressing and holding Volume Up, Volume Down and Power buttons together until the display turns on. The device will soon boot into CWM Recovery. Use Volume keys to navigate Power key to select an option in recovery.
5. Take a Nandroid Backup of your current ROM so that you can restore it later if something goes wrong with the new ROM. To do a backup, choose Backup and Restore and hit Backup again. Return to main recovery menu once backup is done.
6. Perform a full data wipe. To do so, tap wipe data/factory reset, then hit Yes on next screen to confirm. Wait for a few minutes until the data wipe process completes.
7. Choose Install Zip from SD card and click Choose Zip from SD card. Now, navigate to the Slim Bean Beta 1 ROM zip file that you copied to your phone (earlier in Step 2) and select it by tapping Power button. Confirm ROM installation by choosing Yes on the next screen and the installation will begin.
8. After the ROM is installed, repeat step 7 but choose GApps zip file instead of ROM zip to install the Google apps package.
9. Once Google Apps is installed, return to the main recovery menu and hit Reboot System Now to reboot the tablet into customized Android 4.2.1 Slim Bean Beta 1 ROM. The first boot may be time-consuming, so leave it alone for a while.
10. Restoring Previous ROM: To restore your previous ROM, boot into recovery, choose Backup and Restore then restore your previous ROM by selecting it from the list.
Android 4.2.1 Jelly Bean firmware based custom ROM Slim Bean Beta 1 is now installed on your Asus Google Nexus 7 3G.
[Source: Android Jinn]
© Copyright IBTimes 2024. All rights reserved.
-

Football Clubs With The Most Arrests And Bans in 2022-23
-

Oil Prices Slip As Investors Eye Israel's Response To Iran Strike
-

Billionaire Declared Missing And Dead In 2018 Is 'Possibly Living In Moscow With Mistress'
-

Wendy's Sued For $20M After 11-Year-Old Gets Brain and Kidney Damage From 'Dirty Meal'


