

Restore Nexus 7 to Stock Android 4.1.2 and Prepare for Android 4.2 Upgrade [GUIDE]

Android users who are eagerly awaiting the release of the latest Jelly Bean upgrade, Android 4.2, for their Nexus devices should ensure that their device is on stock firmware in order to receive the official OTA (Over-The-Air) update for Android 4.2. This guide is especially meant for those users whose device is already rooted with custom ROM Jelly Bean installed on them.
With Android 4.2 Jelly Bean upgrade poised to be released in a couple of days, it is mandatory to restore the stock firmware on your Nexus device to gain official access to Android 4.2. By the way, a restore to stock firmware would mean losing root access, besides a spate of root-based third-party apps and SuperSU access and privileges.
Despite the aforementioned drawback, Nexus devices are the most privileged to receive the Android 4.2 upgrade first, while most other Android devices are still awaiting the overdue official update to base Android 4.1, and a few to Android 4.1.2.
Prerequisites
- The instructions and the tools provided in this guide are compatible only with the Google Nexus 7 tablet and will not work with any other device.
- The restoration procedure will wipe out all your apps, data and settings. Hence, it is recommended that you back up your apps, important data and settings either manually or using the automated backup tool provided in this guide to avoid data loss.
- The instructions provided in this guide are meant for reference purpose only and do not cover any warranty claims involving device damage or issues arising out of using the tools provided. Users are cautioned to proceed at their own risk.
How to Restore Nexus 7 to Stock Android 4.1.2 and Prepare for Android 4.2 Upgrade
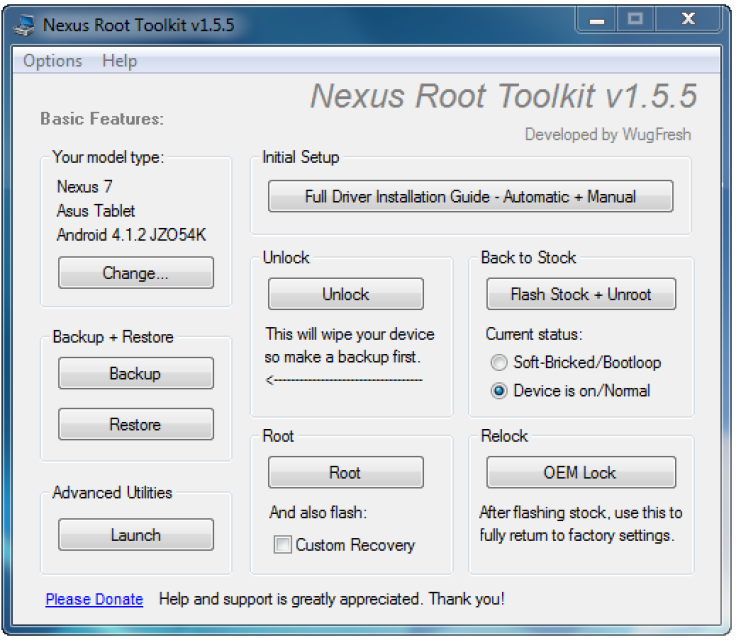
Step 1: Assuming that you have either rooted a stock ROM or running a custom ROM, the guide employs an extremely handy tool called Wug's Nexus Root Toolkit with due credit to XDA developer WugFresh. Download Wug's Nexus Root Toolkit from here.
Step 2: Double click on the Root Toolkit zip file that you downloaded in step 1 to install it on your computer. After the toolkit is installed, double-click on its desktop shortcut to launch the application.
Step 3: Enable USB debugging mode by navigating to Settings > Developer options and then check the option Installation from Unknown Sources in security settings. Now, connect your Nexus 7 tablet to the computer with an USB cable.
Step 4: Go to Toolkit main menu and hit the Backup button. This will take a full backup of your current ROM and help you restore it if something goes wrong later. Wait until the backup process completes.
Step 5: Return to the main menu and check or enable the Device is on/Normal option under Back to Stock settings. Now, click the "Flash Stock + Unroot" button. Finally, click OK in the pop-up message window.
Step 6: A new message window will pop up. Choose NAKASI: Android 4.1.2 - Build JZO54K from the factory image drop-down list. Then select the option Automatically download + extract the factory image selected above for me. Click OK.
Step 7: Stock Android 4.1.2 factory image starts downloading now, and it may take a few minutes to complete depending on your internet connection speed.
Step 8: After the download completes, another confirmation message box pops-up asking if you want to go ahead and flash the stock image. Click OK.
Step 9: Your device should boot into bootloader mode and verify the fastboot status. If you get Device not detected message, just click cancel. Then, disconnect and reconnect the device, and finally click OK on the step 6 screen again.
Step 10: When the device gets detected, you will see a new message box, prompting for a confirmation. Click OK.
![Restore Nexus 7 to Stock Android 4.1.2 and Prepare for Android 4.2 Upgrade [GUIDE]](https://d.ibtimes.co.uk/en/full/319659/restore-nexus-7-stock-android-412-prepare-android-42-upgrade-guide.png?w=736&f=c355a9899f83fc4cc36b280be125c4d9)
Step 11: A new DOS message window pops-up showing the progress of flashing stock Android 4.1.2 firmware on your device. Wait until the flashing process completes and let your device boot into the OS. Then press any key to exit the DOS mode.
Step 12: Close the toolkit application and disconnect the Nexus 7 from the computer.
NOTE: Relocking the bootloader is only optional and should not affect OTA updates in any way. Also, running the stock firmware on a rooted Nexus 7 ROM should not affect OTA updates. However, it is recommended to leave the ROM unlocked and unrooted to avoid conflicts. You may safely root the device again after installing the Android 4.2 upgrade.
Your Nexus 7 device is now successfully restored to the factory or stock firmware, and technically ready for the Android 4.2 upgrade.
[Source: The Android Soul]
© Copyright IBTimes 2024. All rights reserved.


