Update Nexus 4 to Android 4.2.2 Jelly Bean with LiquidSmooth ROM [How to Install]

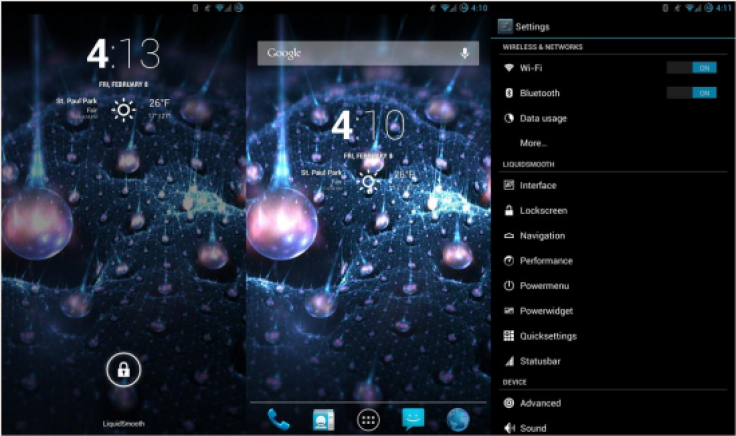
Nexus 4 users recently received the latest official Jelly Bean firmware, Android 4.2.2 JDQ39, from Google. The official firmware comes with a host of minor feature enhancements such as enhanced quick toggles that can be long-pressed to toggle Wi-Fi or Bluetooth. Now, the latest LiquidSmooth custom ROM (RC1) adds several custom feature enhancements to the stock/official firmware to bring a custom Android experience to the user.
NOTE: As the LiquidSmooth ROM is a RC1 release, which is still under development, it may harbour a few untested bugs or broken features. However, all such bugs and issues are expected to be fixed in the upcoming updates.
Key Features of LiquidSmooth ROM
- Google GCC 4.7 Toolchain
- O3
- Strict-Aliasing (Linaro)
- C++11 Mode
- Optimised String Handling Routines (Linaro/Sony)
- Misc other Linaro and Code Aurora Optimaztions
- Customisable lockscreen buttons and sliders
- Chronus clock widget
- Customisable hardware and software keys
- Transparent navbar and status bar
- Customisable navbar ring
- Navigation bar widgets
- Customisable power menu
- Customisable quicksettings panel
- Statusbar mods
- Theme engine
- Quiet hours
- Volume rocker music controls
- Full Rotation
- Customisable battery and notification light
Key Points to Note
- LiquidSmooth ROM and the instructions given in this guide are applicable to the LG Nexus 4 E960 model only and will not work on any other device. Verify your device's model number by navigating to Settings > About Phone.
- Back up your important data and settings on the phone using ClockworkMod (CWM) recovery.
- Make sure that the phone has at least 80 percent battery charge to prevent unexpected device shutdown during firmware installation (which may permanently damage or brick your device).
- Verify that the correct USB drivers are installed for Nexus 4 on your computer (download USB drivers)
- Ensure that USB Debugging mode is enabledon your phone by navigating to Settings > Developer Options (if the phone is running Android 4.0 or later) or go to Settings > Applications > Development (if the phone is running Android 2.3 or earlier). Otherwise if the device is already running Android 4.2, then do the following steps:
- Go to Settings > About Phone
- Navigate to the bottom of the screen and select Build Number.
- Now, tap Build Number for seven times until the hidden Developer Options is unlocked or revealed under Settings. Then select the checkbox for USB Debugging mode to enable it.
- Make sure that your phone is rooted with CWM recovery installed on it.
- If the device is stuck at boot or experiencing boot loop issues, then perform Wipe Cache Partition and Wipe Dalvik Cache few more times before rebooting.
- Allow the newly installed ROM to stabilise for about five minutes before you start working on it.
- The instructions provided in this guide are meant for reference purpose only. IBTimes UK will not be held liable if you damage or brick the device during or after firmware installation. Users must proceed at their own risk.
Downloads
- LiquidSmooth ROM 4.2.2 Jelly Bean ROM For Nexus 4 E960
- Google Apps
How to Install Android 4.2.2 LiquidSmooth Jelly Bean ROM on Nexus 4
1. Connect your Nexus 4 to the computer with the USB cable.
2. Without extracting, copy the downloaded ROM and Google Apps zip files to the root folder of your phone's SD card.
3. Disconnect the USB cable from computer and then switch off your phone.
4. Boot into Recovery mode. To do so, press and hold Volume Up, Volume Down and Power button until the screen flashes, then release all buttons. [Note: Use volume buttons to scroll and Power button to select an option in recovery].
5. Take a Nandroid backup of current ROM on device, so that it can be restored later if the new ROM fails to work or you want to return to original ROM. To perform a backup, choose Backup and Restore, then on next screen hit Backup again. Return to main recovery menu once backup is done.
6. Perform full data wipe task. To do so, click Wipe Data/Factory Reset, then choose Yes on next screen to confirm. Wait for a few minutes until data wipe process completes. Now return to CWM recovery main menu. Hit Wipe Cache Partition and after wiping process is done, click Wipe Dalvik Cache under advance option.
7. Choose Install zip from SD card, then click Choose zip from SD card. Now, browse and select Liquid-JB-v2.1-RC1-mako.zip file that you copied to your phone earlier in Step 2 by tapping Power button. Confirm the ROM installation by choosing Yes on the next screen and the installation will begin.
8. After the ROM installation is complete, repeat step 7 but choose the gapps-jb-20121212-signed.zip file instead of ROM zip to install Google apps package.
9. After Google Apps is installed, return to the main recovery menu and hit Reboot System Now to reboot the phone into Android 4.2.2 LiquidSmooth Jelly Bean custom ROM. The first boot may take some time. So, leave it alone.
10. Restoring Previous ROM: To return to your previous ROM, boot into Recovery, choose Backup and Restore option then restore your earlier ROM by selecting it from the list.
Android 4.2.2 LiquidSmooth Jelly Bean Rom is now successfully installed and running on your LG Nexus 4 E960.
Also, check out our step-by-step guide: Galaxy S3 I9300 Receives Android 4.2.2 LiquidSmooth Jelly Bean ROM [How to Install]
[Source: Android Jinn]
© Copyright IBTimes 2024. All rights reserved.
-

Uber Eats Starts Robot Deliveries In Tokyo
-

Former "The Mandalorian" Actress Gina Carano Heaps Praise On Elon Musk, Compares Him To Batman
-

Quebec Approves X Gender Marker For Trans And Non-Binary People On Provincial Cards
-

Elon Musk Calls £4.42B Lawyer Fees 'Criminal' In Tesla Pay Dispute
-

France Enshrines Abortion As Constitutional Right In World First
-

Netizens Air Looting Concerns After Nike Announces First US 'World Of Flight' In Philadelphia
-
Copilot Offers Controversial Responses On Teaching Sex, DEI, LGBTQ Topics In Preschool