

Upgrade HTC Desire HD to Android 4.1.1 Jelly Bean with Jellytime ROM [How to Install]


HTC Desire HD finally gets its first Android 4.1.1 Jelly Bean update through custom ROM firmware, thanks to the dedicated efforts of XDA recognised developer, randomblame. On the downside, there is still no word on the official Jelly Bean firmware update release from HTC for the phone, and this makes the need for stable custom ROMs that much more important for HTC smartphone users.
The first Jelly Bean firmware upgrade comes to the Desire HD smartphone after a long break, thanks to Jellytime custom ROM firmware. The last Android update that came to the smartphone was the Blackout custom ROM based Android 4.0.4 ICS firmware. The ICS firmware was then based on the CyanogenMod 10 (CM10) release and featured pure and stable stock Android onboard with Google Nexus like looks.
The Jellytime custom ROM firmware ports a plethora of advanced features that are focused on enhancing the overall user experience. Here is the complete list of working and non-working features as cited by the firmware developer:
Broken:
- Headset buttons do not work
Working:
- Wifi Tethering
- Camera
- Mic
- Accelerometer
- Audio
- Bluetooth
- Wifi - may not support some channels
- HW acceleration
- Buttons
- Lights
- GPS
- GSM
Key Points to Note
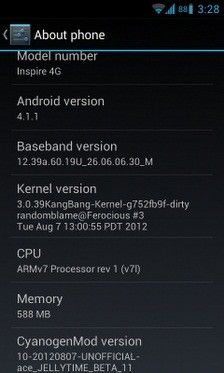
- The Jellytime ROM and the instructions given in this guide are applicable only to the HTC Desire HD model and will not work on any other device. Verify your device's model number by navigating to Settings > About phone.
- IBTimes UK advises users to back up apps, important personal data and settings to avoid data loss while installing the Jellytime ROM based Android 4.1.1 Jelly Bean update. HTC Sync does not detect your phone after installing the custom firmware and hence it should not be used to backup your data. Instead, you should be using CWM recovery (steps given in the guide) to back up your data alongside the existing firmware settings.
- Verify if your phone is actually rooted or not by downloading and running Root Checker app from the Google PLAY Store before applying the Jellytime firmware update.
- Enable USB debugging mode by navigating to Settings > Applications > Development and check USB debugging option. This feature supports USB connectivity between your Android phone and the computer.
- Make sure that your phone's battery is at least 85 percent charged to prevent unexpected device shutdown (due to battery drain) while flashing the custom ROM or installing the Android 4.1.1 Jelly Bean update.
- Verify that the phone's bootloader is factory unlocked and ClockworkMod (CWM) recovery is installed on it before proceeding with the Jellytime firmware installation.
How to Install Jellytime ROM Based Android 4.1.1 Jelly Bean Update on HTC Desire HD
- Download the latest Jellytime Android 4.1.1 Firmware from here to your computer. Once the ROM is downloaded, connect your phone to the computer and copy the downloaded zip file to the root folder on your phone. After the file is copied, disconnect the device and boot into the Recovery Mode.
- To boot into Recovery Mode, press and hold the Volume Down and Power Buttons together until you see the recovery mode screen on your phone. Alternatively, you can also boot the device in recovery mode using ROMManager app which can be downloaded from the Google Play Store.
- In recovery mode, choose install zip from sd card and click choose zip from sd card. Then, browse and select the Jellytime based Android 4.1.1 Firmware which you copied to your phone in step 1. Please note that once the file is selected, the ROM installation will take about 4 to 5 minutes to complete.
Note: If the firmware update process stops responding or gets stuck for any reason, just repeat the above steps from the start after reinserting the battery.
Jellytime ROM based Android 4.1.1 Jelly Bean update is now successfully installed on your HTC Desire HD. Go to Settings > About phone to verify the firmware version installed.
For further assistance, check out the video tutorial below [Courtesy: XDA Developers/Flow-Wolf]
[Source: Android Advices]
© Copyright IBTimes 2025. All rights reserved.
- MOST POPULAR IN Technology


