

How to Install Android 4.4 KitKat on PC via Android x86 ISO

Android has for long been restricted to smartphones and tablets, and is rightly considered as the mobile operating system. However, the advent of unofficial builds of Android designed exclusively for Intel's x86 hardware architecture with the likes of Dell XPS12 has changed the platform game.
Windows desktop or laptop or PC users are no longer restricted to using one-dimensional software and can indeed experiment with new open source software such as Android 4.4 KitKat, thanks to the release of fully-blown Android-x86 OS for PC.
Unlike the earlier builds, Android-x86 software extends support to numerous hardware manufacturers including Dell with an easy to setup installation procedure.
IBTimes UK reminds its readers that it will not be held liable for any damage to device during or after Android-x86 software installation. Users are advised to proceed at their own risk.
Prerequisites
- Download the Android-x86 ISO file which is more appropriate for your laptop, desktop or tablet model (check for model numbers with the download links).
- USB flash drive or a bootable CD/DVD drive
- Ensure there is sufficiently free hard disk space on the computer/laptop on which you want to install Android-x86 OS:
- For Froyo – ICS, 2GB
- For Jelly Bean 4.2 and 4.3, 8GB
- For KitKat 4.4.2, 10GB
Steps to Install Android 4.4 KitKat on Your PC
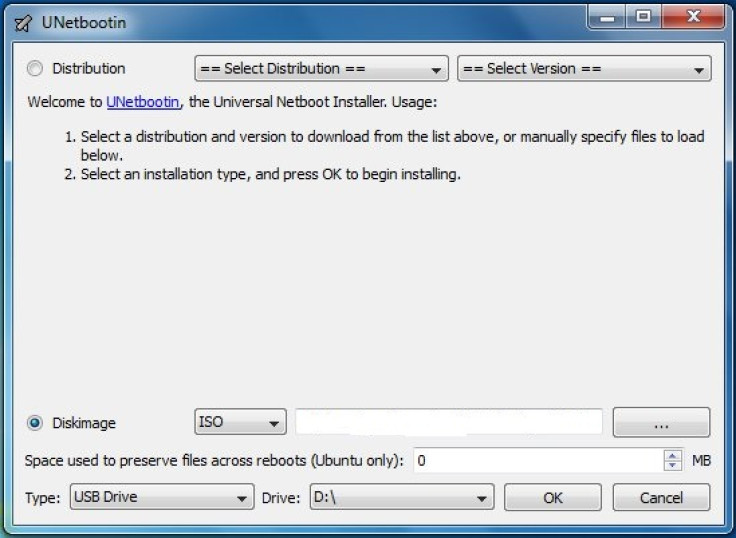
- Download the version of Android-x86 ISO that's suitable for your computer hardware, and UNetbootin tool for flashing.
- Make a bootable USB drive with Unetbootin and the ISO image you downloaded earlier. Just click on the Diskimage button (see screenshot below) and select the ISO file you downloaded in step 1.
- Reboot the computer with USB drive as source by tweaking a couple of settings in system BIOS. However, latest computers often default to USB drive at boot time, whenever it's available.
- In the ensuing pop-up menu, select Install Android x86 to hard disk.
- Choose the partition where you wish to install Android x86. If you chose to use a new partition, don't forget to format it right away.
- Allow the install process to continue (Choose Yes or confirm to continue), as you are prompted to give permissions at various stages during GRUB Bootloader installation. Do not click cancel at any stage, else the system bootROM might get corrupted.
- Now another prompt will ask your permission to perform system /r/w (read/write operations). Just click Yes to continue.
- If you prefer to install ICS or earlier versions before KitKat, then you get another prompt to install virtual SD card. You may use 1800 MB of hard drive space as virtual SD card for flashing firmware. It is the maximum space supported.
- Once the Android-x86 software is completely installed, reboot the computer.
As this installation supports multiboot setup, you can switch between Windows or Android at boot time, according to your taste.
[Source: Redmond Pie]
© Copyright IBTimes 2024. All rights reserved.
-

Doug McMillon Unloaded Walmart Trucks For $6.50/Hour In 1984, Now He's The CEO
-

Utah Couple Doesn't Know Cat Jumped Into Amazon Package, Accidentally Ships It to California
-

How Are Female Tech Firms Fighting the Employment Crisis in the West Bank?
-

Italian PM Has British Newborn With Heart Defects Airlifted to Rome for Treatment Unavailable in UK


