Robox 3D Printer review: Great print quality but software is far from user-friendly

Key Features:
- 0.3mm and 0.8mm dual nozzles
- Prints in ABS, PLA, HIPS Nylon, PC, PVA
- 20 microns layer resolution
- 210 x 150 x 100mm build volume
- Included Robox AutoMaker software
- Price as Reviewed: £999.90 on Amazon
The exciting futuristic 3D printing technology we've been hearing so much about is finally coming to consumers, but how easy is it to use a 3D printer to create items in the comfort of your own home?
The Robox 3D printer is the flagship product of UK firm CEL and was considered to be one of the most promising desktop 3D printers by many in the industry when it debuted at CES 2014, as well as receiving crowdfunding that was over double of its original £100,000 goal on Kickstarter.
Robox: Design and Features
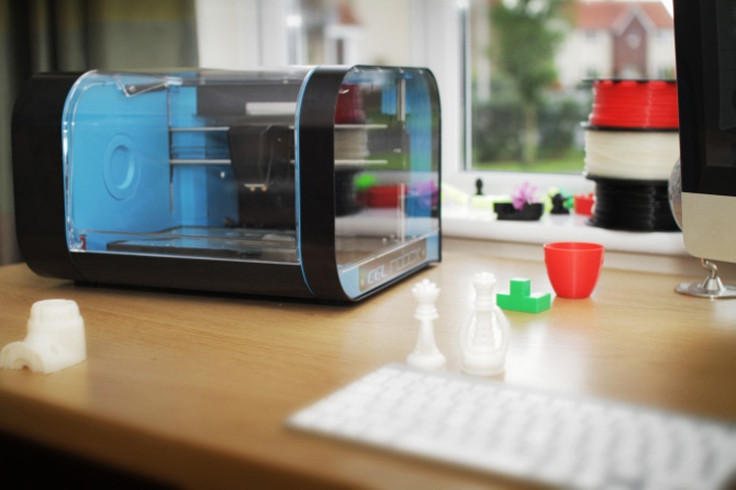
Now out of Kickstarter, the Robox is available to order online for £999.90, and for that you get a desktop 3D printer which includes safety casing, print bed, a single extruder with dual nozzles printing at different thickness, a reel of filament, a set of tools to refine your printed item and a USB stick with the software and user manual on it.
The Robox is quite well-designed – the 3D printing goes on in a nice closed and locked cabinet casing with no bits sticking out, so it's perfectly safe for pets, for example if your cat seeks to curl up on top of it or sashay around it, as well as from the wandering hands of school-aged children.
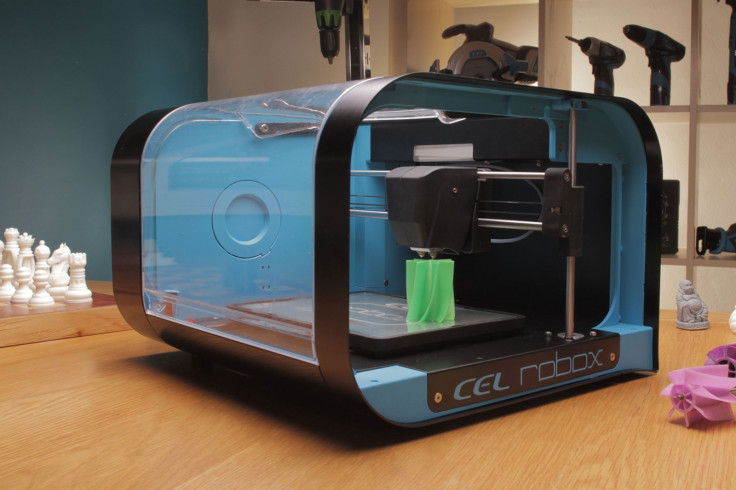
This is a lot better than the bare bones approach to 3D printing where all you get is a steel pole holding the extruder and a small print bed, and the Robox is also cheaper than the MakerBot Replicater, a consumer 3D printer with a similar build volume and safety cabinet that retails for £2,199 excluding VAT in the UK.
The Robox is also the only 3D printer to have a microchipped filament reel system that lets the printer know what filament it's working with. While this means you can't attach another company's filament reel, you can wind the filament onto an empty Robox filament reel and then reprogramme the microchip in the accompanying AutoMaker software.
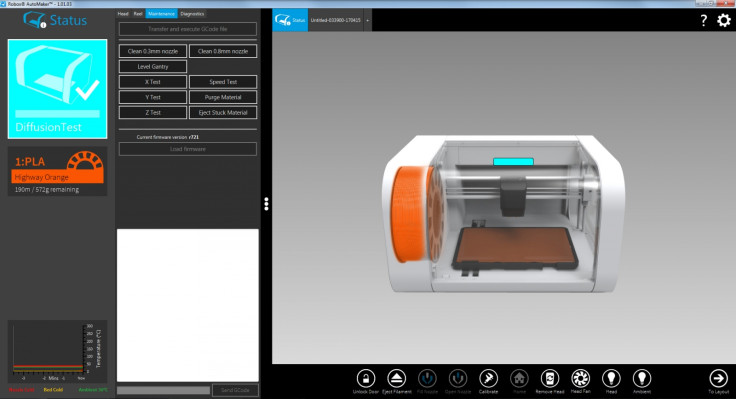
The AutoMaker software controls the 3D printer via USB and you can open up .stl files, i.e. stereolithography CAD software files to print, decide how big and how the item is oriented as it prints.
You can also choose how quickly to print your object out and how nice the quality is, with the choice of Draft (low quality), Normal (medium quality) or Fine (high quality).
However, even the lowest setting is still much better than many other desktop 3D printers on the market, with a layer resolution of 20 microns compared to most desktop 3D printers including the MakerBot Replicater, which have layer resolutions of 100 microns and up.
Robox: Usability
If you're not a product designer or someone familiar with 3D modelling software, the fastest way to get started is to visit a free open repository of CAD files with neat designs uploaded by other people that come with creative commons licenses. Some good places to look at are Thingiverse and MyMiniFactory.
In theory, it sounds very easy to just open up a 3D modelling file, tell the printer to print it, and then sit back and relax while it does the job. However, while there is a great interest amongst consumers in getting into 3D printing, the reality might not meet their expectations.
From using the Robox, my impression of 3D printing is that it is a difficult and very time-consuming hobby that can be frustrating no matter what kind of high-end or low-end 3D printer you have, and professional movie prop maker friends have told me that 3D printing can make them angry whenever they need to print something.
Although the Robox is marketed as being incredibly simple to get started, the Automaker software is not user-friendly at all, containing a large amount of technical terms and no simple explanation of what they mean.
It takes a while to figure out where exactly you need to go to open a CAD file to print it, and then you still need to figure out what the measurements of the item you want to print should be, as the person who designed the file doesn't always have exact measurements in mind.
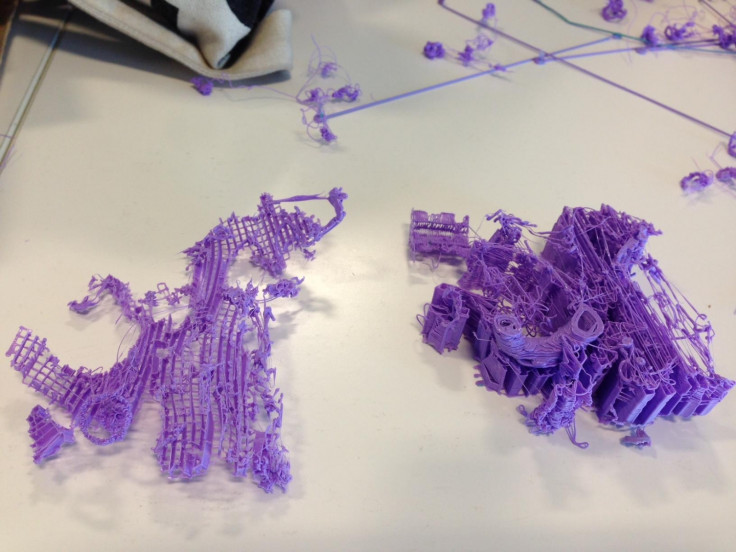
When we first received the 3D printer, the top requests from IBTimes UK colleagues and friends was that we print out a dragon. Unfortunately that failed spectacularly because the dragon didn't have a flat base and had lots of overhanging parts for the wings, tail and head.
And even if you lay an object on its side, if the side you designated to go on the print bed didn't have a flat base, then it would come out with half melted plastic bits that can't really be removed, even with the included tools (see the elephants in our video).
As 3D printers could be useful to cosplayers, i.e. people who like to make their own costumes and props from scratch, we tried to print out Joffrey's crown from the Game of Thrones, but two attempts at this also failed even when we tried to use support material.
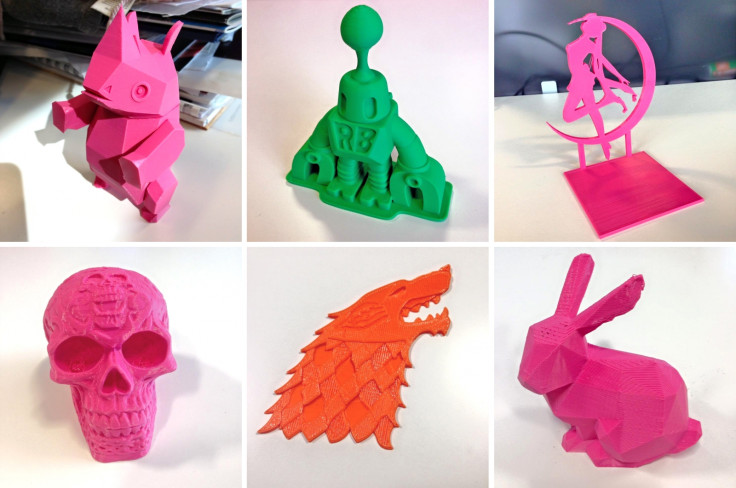
But this doesn't mean that the 3D printer can't print. In fact it can make some incredibly beautiful prints with tiny layers, as long as the items printed have a flat base on one of the sides, which according to the company is a problem with all 3D printers and depends on how well the CAD file is designed.
We did have significant success printing out a rhino toy that clips together from multiple pieces by a Japanese product designer, the hollow Celtic skull by Artec (a famous 3D printing example that can be printed without support material) and even a Sailor Moon anime character bookend which featured thin and precise curves.
Colleagues in our newsroom also complained that the 3D printer made a lot of noise, so we had to move it into a separate room while we reviewed it.
Robox: Troubleshooting
You must expect to spend about 40% of your time fixing the 3D printer when it goes wrong. One of the most common errors to receive is the "filament slippage" error, which means that the filament is not coming out of the extruder for some reason.
There can be 101 reasons why this has happened, but mostly, you will need to eject the filament, ask the 3D printer to eject any stuck material, feed the filament into the machine again, and run the Purge Material test.
Unfortunately, this simple-sounding solution is not listed anywhere in the 122-page instruction manual PDF file, and the Robox forums are even less helpful. The filament slippage error asks you to consult the manual, but that's it.
Advice found on the forum tells users to run all the calibration tests, but the problem is that sometimes running these tests can actually make everything worse and mess with the calibration settings without solving the problem. There are no warnings or tips within the program to advise you to try other ways to fix the problem first.
And if you do manage to mess up the calibration settings and would like to reset them back to the default settings, like we did – well, then you're going to have to locate the well-hidden advanced settings in order to access the "restore to default settings" button.
Also, it would be handy if you could open parts of the machine without needing to use a screwdriver – this would be very handy for opening the print head or the filament reel system to locate and remove stuck filament.
So if you're a consumer and something has gone wrong with your Robox and you have no idea what to do as it refuses to work, all you can do is file a support ticket with CEL, and they will reply by email.
Due to the high volume of support requests, CEL now offers telephone support if email assistance cannot solve the problem.
Robox: The Verdict
The Robox 3D printer is a well-made machine that is safe to use and can print out items to a high level of detail, and there's a possibility in the future to expand it to have a second extruder so you can print in two colours at once.
However, the software controlling the 3D printer is not where it needs to be yet. The AutoMaker software is not user-friendly, so you need to stumble around clicking on things and exploring, or reading the entire 122-page manual, or trial-and-error printing things out in order to learn to use it.
Consumers are very interested in 3D printing, but at the moment, the user experience doesn't seem to be simple and intuitive enough for this to become a mass-use item. If you don't specifically need anything to be printed for a project or work, using a 3D printer can be as much of a hassle as it is rewarding.
Robox 3D Printer Scores
Design: 8/10 – Well-designed printer but it could do with troubleshooting trapdoors
Print quality: 9/10 – Stunning print quality possible even with the lowest, fastest settings
Software: 3/10 – Unintuitive buggy software and a complex user interface
Performance: 6/10 – When it works, it churns out items well, but there are frequent problems
Overall: 6.5/10 – Good value print for the price but you will spend 40% of your time fixing it
The Good:
- Stunning print quality, the best we've seen in desktop 3D printers
- Good design keeps children, pets and adults from harm
- Works straight out of the box
- Future-proof with space for second extruder
The Bad:
- AutoMaker software is not user-friendly
- Not enough tips and guides to aid users
- Hours of testing required to troubleshoot problems
- You can only print in one colour at a time
© Copyright IBTimes 2025. All rights reserved.
- MOST POPULAR IN Technology