

How to update Moto G (1st Gen) to Android 5.1 Lollipop with AOSP beta ROM

Last week Motorola started the Android 5.1 soak test for the Moto X 2nd Gen Pure Edition and put out a release note for the update. The public release of the update is expected in the next few weeks, followed by the software release for the company's other Moto line-up.
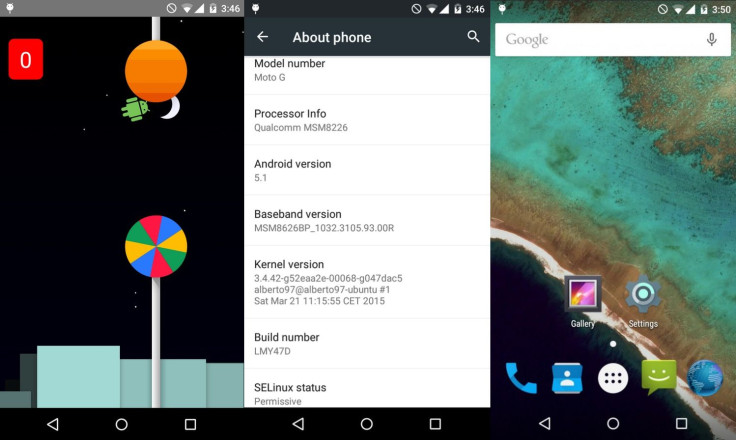
While there is no information on the date of the latest Android Lollipop update roll-out, senior XDA forum member, Alberto97 has made an AOSP (Android Open Source Project) beta, based on Android 5.1 Lollipop, for Moto G 1st Gen. Since the AOSP build is in its beta state, all the features might not function properly with the installation.
Working:
- RIL
- Wi-Fi
- Bluetooth
- Audio
- Mobile Data
- Offline Charge
- USB OTG
- MTP
- Hotspot WiFi
Not Working/Bugs:
- Stock SMS app can't send messages (but Messenger works fine and other apps too)
- Doesn't support CDMA variants (for now)
- Dual Sim (No SIM recognised)
ROM info
- ROM OS Version: 5.1.x Lollipop
- ROM Kernel: Linux 3.4.x
- ROM Firmware Required: Stock Lollipop and/or 41.18 Bootloader
- Based on: AOSP
- Status: Beta
If you still want to taste the beta firmware on your Moto G ahead of the official roll-out, check out the installation guide. But proceed with extreme caution.
Download files
Android 5.1 AOSP build
Gapps
Points to remember
- Before following the installation guide, create a backup of all important data of the phone using custom recovery.
- Enable USB Debugging on the phone to connect it with the computer and use Android SDK with it. [Navigate to Settings>> About phone. Tap on Build Number several times until a message appears saying 'You are now a Developer.' Now enable USB Debugging Mode by navigating to Settings>> Developer Options.]
- The Moto G should have above 80% battery charge to avoid power off during the process which could damage the device.
- The phone should be rooted with the latest recovery system installed on it. Also, it should have an unlocked bootloader.
- As the AOSP ROM is in beta stage, bugs are highly likely.
- The Android 5.1 Lollipop AOSP beta firmware works with Moto G 2013 aks 1st Gen. Flashing this on any incorrect variant might brick the device. Therefore, verify the model number of the device.
- After flashing the ROM if the device gets stuck on booting animation or experience boot loop then perform wipe cache partition and wipe dalvik cache for a few times before rebooting the device.
- Once the ROM is installed, users are advised to give 10 minutes to the ROM after the device boots up for the first time for better user experience.
How to install Android 5.1 Lollipop AOSP ROM on Moto G (1st Gen)
Step-1: Connect and mount your Moto G USB memory to the PC using USB cable
Step-2: Transfer the downloaded file to a safe location in your phone's storage. Ensure that files are in the SD card root, not inside any folder
Step-3: Unplug the USB cable from the phone and switch it off
Step-4: Place the phone into recovery mode by pressing and holding Volume Up and Power buttons together for a few seconds
Step-5: In recovery mode, perform a full data wipe by selecting wipe data/ factory reset. Use Power button to select any option and Volume keys to navigate between options while in Recovery Mode
Step-6: Also perform wipe cache partition
Step-7: Go to advanced menu and select wipe dalvik cache. This process is to ensure that your phone does not get into any bootloops or any other errors
Step-8: Go to main recovery menu and select install zip from sdcard >> choose zip from sdcard. Navigate to the folder where you have saved AOSP ROM. Select it and confirm installation on the next screen
Step-9: Repeat the same procedure to install the Gapps file on the phone
Step-10: Finally reboot the phone by selecting reboot system now
Your Moto G should now be updated with AOSP Android 5.1 beta build.
[Source: XDA]
© Copyright IBTimes 2025. All rights reserved.
- MOST READ


