How to disable automatic download of Windows 10 upgrade files on PC

Upgrading to Windows 10 could be a major hassle to certain users who are running the more stable version of Windows 7 or 8.1, especially given the numerous inherent bugs and post update issues that have marred the user experience on Microsoft's latest operating system.
Although Microsoft is offering Windows 10 as a free upgrade to existing licensed users of Windows 7 and 8.1, it could pose serious problems to those running short on storage space or using a metered internet connection. This is especially true due to the fact that the company has automated the Windows 10 download process and this could become a major hassle on computers with limited storage space, as it can take up to 6GB of hard drive space.
Nevertheless, those who wish to prevent Windows Update from downloading the Windows 10 upgrade files automatically, may follow a few simple steps outlined below:
Verify if download already exists
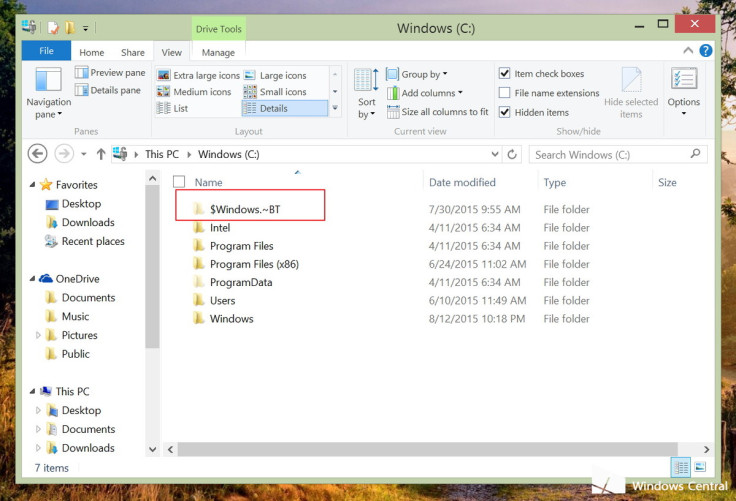
It is necessary to check if the upgrade files already exist on your computer by manually verifying if the $Windows.~BT folder exists on the hard drive:
- Open File Explorer, and from the ribbon menu, select View, and click on Folder Options.
- Select View, go to "Advanced settings" and check Show hidden files, folders, and drives.
- Click Apply and OK.
- Go to the root drive or "C:" and you should look for the $Windows.~BT folder. If the folder exists, you can check the properties of the folder. If the download has completed you will notice that the folder size is anywhere between 3GB to 6GB.
Disabling automatic downloads via Windows Update service
Disabling automatic download of Windows 10 upgrade files will slightly differ if you're running Windows 7 or Windows 8.1:
- Launch Control Panel and open Programs and features.
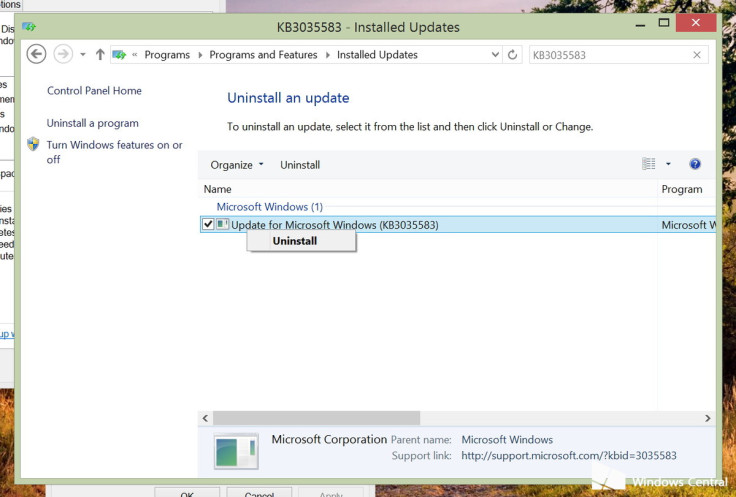
- In the left pane click on the View Installed Updates link.
- If you're running Windows 8.1 Update, check for these updates: KB3035583 and KB2976978. If you're running Windows 7 Service Pack 1 verify if the following updates exist: KB3035583, KB2952664, and KB3021917.
- If any of these updates are found, right-click on each update and click Uninstall from the context menu.
- If prompted to restart, just click to do it later and continue uninstalling the updates.
- Finally, reboot your computer.
Now that the updates are uninstalled, we need to configure Windows Update from installing those updates in the future:
- Launch Control Panel, select Windows Update, and click Check for updates.
- From the left pane, click Important to view uninstalled updates.
- Depending on Windows version installed look for the aforementioned updates, right-click on each of them, and choose Hide update. This will block the service from re-downloading the updates in future.
Reclaiming hard disk space
Finally, you can reclaim your disk space by simply deleting the $Windows.~BT folder. However, you might encounter some permission issues and here is how you fix them:
Launch the Run command and type cleanmgr /sageset: 11 and press Enter.
- In the Disk Cleanup utility, click the Clean up system files.
- Select the Temporary Windows installation files.
- Click OK to complete the cleanup.
Whenever you plan to install Windows 10, just go to Control Panel > Windows Update > Restore hidden updates to unhide the updates so they can be downloaded and installed.
[Source: Windows Central]
© Copyright IBTimes 2025. All rights reserved.
- MOST POPULAR IN Technology