New Nexus 7 Gets All-in-One Toolkit to Unlock/Re-lock, Root, Recovery and More
The new Nexus 7 Toolkit works for Wi-Fi only and GSM/HSPA+/LTE models
Following the market roll-out of Google's new Nexus 7, recognised XDA developer, mskip has released all-in-one Toolkit for the Nexus tablet allowing users to perform multiple functions without any difficulty.
The Toolkit works on both Wi-Fi and GSM/HSPA+/LTE models. It serves several purposes including root, unlock and relock Bootloader, backup, install custom recovery as well as Google stock image along with several tips and tweaks. Besides, the developer has shared easy guide to use the Toolkit.
New Nexus 7 [2013 model] Toolkit functions
Install correct adb/fastboot drivers automatically on Windows xp/vista/7/8 32bit + 64bit
Backup/Restore a single package or all apps, users data and Internal Storage
Backup data/media (Virtual SD Card) to the personal computer (PC) for a full safe backup of data
Unlock/Relock Bootloader
Root stock Jelly Bean builds (up to 4.3.0)
One-click for all to unlock, root, rename the restore file
Perform a full Nandroid backup of the system (Boot, cache, data, recovery and system) via adb and save in custom recovery format on the comuter, which can be restored via CWM Recovery
Pull/ data and/ system folders, compress to a .tar file and save to PC
Dump selected phone partitions, compress to a .zip file with md5 and save to PC
Install BusyBox on the tablet
Extract, tips and tricks section
Auto update Toolkit to latest available version at startup
Programme up to 10 Quickpick slots and run them very quickly
Mods section to automatically perform certain tasks on the tablet
Download Google stock image directly to correct Toolkit folder for extracting and flashing
Check md5 of stock image to make sure downloaded file is not corrupted before flashing
Flash custom recovery or Google stock image to tablet
Rename the recovery restore file present on some stock ROMs
Boot into CWM touch, TWRP or stock Recovery without flashing it
Boot or flash .img files directly from PC
Install a single apk or multiple apk's to the tablet
Push files from PC to the tablet
Pull files from tablet to PC
Dump selected LogCat buffers to PC
Dump BugReport to PC
St files permission on the tablet
Open new Command Prompt for manual input
Reboot the tablet to Fastboot Mode or Android from Fastboot Mode
Reboot tablet to Fastboot Mode, Recovery, Android or Download Mode from adb mode
Display important information about the device
Auto mode detection to put the tablet in the correct mode before perfoming a procedure
Click here to download the Google Nexus 7 [2013 model] Toolkit v1.0.2
Install ADB/Fastboot drivers
1) If you do not want to use the Toolkit to install the drivers then the best drivers to try are PdaNet for Android, download and run the 32-bit Windows 7/Vista/XP or 64-bit Windows 7/Vista and then follow the instructions to install.
2) Once the drivers are installed, disconnect the USB cable and shut down the tablet. Keep holding Volume Up, Volume Down buttons and press the Power button to boot the tablet into FastBoot Mode.
3) Navigate to Control Panel on PC and open the Device Manager to see the FastBoot driver is installed or to install it manually.
4) Disconnect the USB cable. In the Device Manger a new item called Android 1.0 should pop up then the driver should install automatically. Once it is installed, there should be a new section in the Device Manager called Android Phone without an "!", indicating its installed correctly.
Ensure that USB Debugging mode is enabled in Settings (Developer Option) before connecting the USB cable in ADB mode so that the PC can detect the tablet properly.
Note: If the drivers does not install automatically then double click on the Android 1.0 item, then click on the driver tab and select update driver. Then select browse my computer and browse to the Google Nexus 7 toolkit /driver folder. Verify that sub folder is ticked. Drivers should then be installed correctly.
How to use Nexus 7 Toolkit
1) Download the Nexus 7 Toolkit package and install on the PC. The installation will create a Shortcut on your desktop called Nexus 7 [2013] Toolkit for easy access. There should be option to include or exclude the drivers files at installation, so if you have already have driver set up and just updating the Toolkit then untick the drivers as desired.
2) Once the Toolkit is installed, ensure that the tablet is booted and plugged in via USB cable and double click on the shortcut on the desktop to run it. If running the file directly, use the toolkit.exe file to start the Toolkit and not the tkemain.exe file, which may not work properly.
3) Users will now be asked to check for an Update. Type Yes to download and check the latest version numbers against the versions in the Toolkit. If there is an update available then users will have options to download and install it.
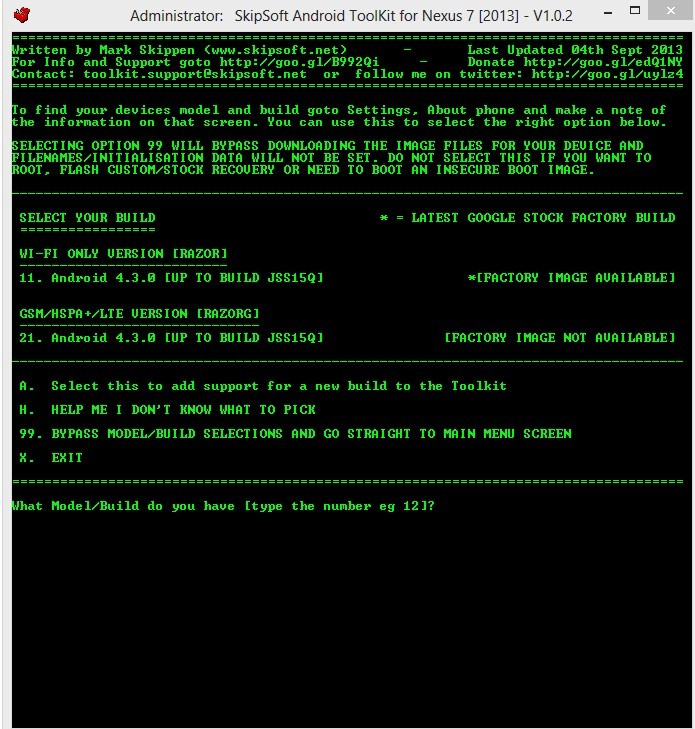
4) Users will now be presented with a Model Selection to choose the Model/Build. Type the number that correspondents to your desired selection. For instance type 11 for Wi-Fi only model [RAZOR] 4.3.0 [up to Build JSS15Q]. In case the build of the device is not found then type h to select the HELP option to get more information.
Note: If you have a new build that is not covered by the Toolkit, type a in the Model Selection screen to see instructions on how to pull stock image and send it to firmware.support@skipsoft.net to add support.
Type 00 on the Model Selection screen to go directly to the activation screen to type the code and upgrade to the Professional version.
5) The Toolkit will now locate and download the image pack for the chosen model. Once the download is completed, it will be extracted to the correct folders and the files checked to ensure everything is correct. In case there is issue while downloading the pack via the Toolkit then download it manually from http://goo.im/devs/mskip/toolkit/google_nexus7_2013/model_files and extract the two folders to the installation folder.
6) In the Main Menu there will be Adb Mode and Fastboot Mode at the top. If the drivers are already installed then the device's serial number will appear under the text with device next to it for the mode users have chosen. This means the device is connected successfully.
7) Each option in the Toolkit has complete information on what it is about and how to use it.
Steps to enter Fastboot Mode
Turn off the tablet
Unplug the USB cable if it is connected
Keep holding the Volume Down button and press the Power button to boot the device into Fastboot Mode
Steps to get into Custom Recovery
First boot the tablet into Fastboot Mode
Navigate to the Recovery Mode using the Volume Down button the press the Power button to enter Recovery
Note: To show the Menu in the stock recovery screen hold the Power button then press the Volume Up button. The blue recovery menu screen should appear.
[Source: XDA]
© Copyright IBTimes 2025. All rights reserved.
- MOST POPULAR IN Technology