How to Set up Your New iPhone 6 and iPhone 6 Plus for First UseApple
First shipments of the iPhone 6 and the iPhone 6 Plus have started arriving and if you are one of the lucky few owners of Apple's next-gen flagship phone then you could go ahead and set up your iPhone.
Here is a simple step-by-step guide to walk you through the process of setting up your iPhone for first use:
Switch on your iPhone by pressing the Sleep/Wake or Power button at the top right-hand corner.
You will now see the Hello screen. Swipe from left to right on the screen to begin the set up process.
Follow the onscreen prompt and insert a SIM card to proceed further.
Next you need to select the Language by tapping on your preferred language and let the language setup complete.
Then select your country or region from the list.
Choose a Wi-Fi network as prompted by tapping on the preferred Wi-Fi network.
Now enter the password for your Wi-Fi network (if it is a secure network), and tap Join to proceed.
Based on your preference choose if you want Location services to be enabled or disabled. For instance, you can enable Find my iPhone service, which is highly recommended.
Then set up your iPhone as a New iPhone, or restore from iCloud Backup or from iTunes Backup. For illustration purpose, this guide demonstrates setting up the iPhone as a New iPhone.
Now sign in with your Apple ID or create a Free Apple ID. If you already have an Apple ID, select sign in with Your Apple ID.
A message prompt asks you to Verify your identity, if you've two-step verification enabled. Just tap on the device to receive a verification code and select it, and finally tap Send.
This will send the 4-digit verification code to your other devices. Enter the verification code on the new iPhone to continue.
You need to accept the Terms and Conditions by hitting Agree in the bottom right corner of the screen. You will again get a popup asking you to confirm. Tap on the Agree button to confirm and proceed.
Setting up your Apple ID may take a few minutes. So, give it some time.
Next, you will get an option to either use iCloud or Don't Use iCloud. Select Use iCloud option to get online storage access for your favourite songs, music albums, videos and more.
You will be prompted to Use or Don't Use Find my iPhone. Find My iPhone is a free service with security enhancements for your iPhone such as locking, finding and erasing its content when you lose it. Select Use Find my iPhone option to enable this feature.
Tap on Next to proceed.
Select the email ids and phone numbers that can be used to contact you via iMessage and FaceTime. Deselect those you do not need and tap on Next.
A message prompt asks you if you want to upgrade to iCloud Drive. As iCloud Drive is currently in beta, you should avoid installing it. Tap on Not Now to proceed and then Tap on Continue to confirm skipping iCloud Drive upgrade.
iCloud settings will now be updated.
Now set up Touch ID finger via fingerprint sensor, which allows you to use your fingerprint to unlock your iPhone without needing a passcode. If you feel it is not needed, select Set Up Later Option, otherwise tap on the Set Up Now option.
Next you need to Set Up FingerPrints by scanning the finger or thumb you normally use on the Home button.
Place the finger or thumb on the Home button. Lift and rest your finger on the Home button repeatedly until the fingerprint animation on the display fills up with red color as you continue. It should take less than a minute for the animation to turn fully red.
After the entire fingerprint animation turns red, it will prompt you to adjust your grip to capture the edges of your fingerprint.
Now place your finger on your Home button and then lift and rest the edge of your finger on Home Button repeatedly.
After the entire fingerprint animation turns red, it will notify that Touch ID was successfully set up, and your fingerprint can now be used for unlocking your iPhone. Hit Continue.
A Passcode prompt should appear on screen. Enter four-digit passcode, and then re-enter to confirm.
You can also use Touch ID to approve purchases on iTunes Store, the App Store and the iBooks Store. Tap on Use Touch ID for Purchases if you want to use this feature or choose Set Up Later.
Then you need to setup iCloud Keychain on your new iPhone. You can do this by approving it from other device or use iCloud security code or choose not to restore passwords. If you tap on Approve from Other Device, it will tell you that the Approval Request has been sent to the other device. You can continue setup and approve this iPhone at any time from the other devices using iCloud Keychain.
Tap on Automatically Send if you want to send diagnostics and usage data to Apple. Else tap on the Don't Send option.
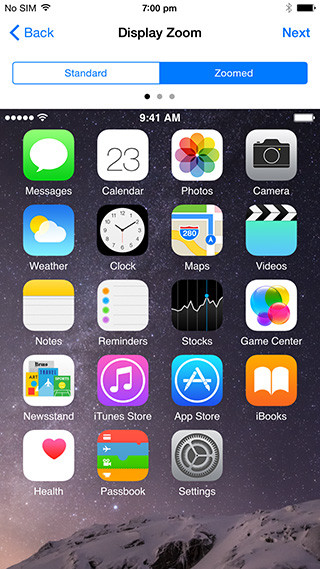
Next you may want to choose Display Zoom and customise how you would like to view your iPhone. Tap on Choose a View.
You can choose between Standard and Zoomed modes in this screen.
Next you will see the Welcome to iPhone screen.
Tap on Get Started to go to the Home screen, and you are all set to start using your new iPhone 6 or iPhone 6 Plus.
You may want to change the name of your iPhone especially if you use multiple iOS devices, as by default the software will use your first name and append iPhone to it. For instance, Getty's iPhone or change it to a specific model name such as iPhone 5 or iPhone 5s or iPhone 6.