

How to update Nexus 6, 5 and 4 to Android 5.1.1 build LMY47V with Chroma AOSP ROM
Google's latest Android 5.1.1 Lollipop build version LMY47V, which was officially available for Nexus 7 series and the 10in Nexus tablet only, can be now installed on the Nexus series smartphones such as Nexus 6, 5 and 4 via Chroma ROM.
Chroma ROM is a lightweight AOSP ROM, with more focus on battery, performance and stability. This custom build reportedly offers an experience close to Google's stock Lollipop firmware with additions of essential features, which the stock update do not have.
Besides, it supports innumerable customisations and tweaks. Check out the detailed ROM features and changelog to know more about Chroma ROM.
- Franco Kernel
- Layers 2.1 support
Silent mode (Settings > Sound & notifications > Interruptions)
- Native LED notifications (solid, limited to RGB colors)
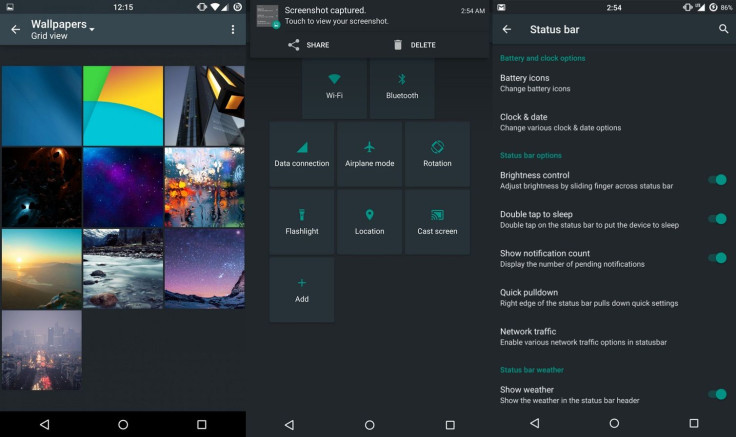
Status bar customisation:
- Battery Style (Icon Portrait/Landscape, Circle, Text, Hide) and battery percentage
- Clock & Date (Show/Hide, Color, Alignment, AM/PM, Show/Hide Date, Date Style, Date Format)
- Brightness control (long press status bar to change brightness)
- Double-tap status bar to turn screen off
- Show/hide notification count
- Quick pull-down on left/right side to pull down tiles
- Network traffic
- Pressing on clock or date on status bar opens up Clock, Calendar
- Tile customisations (LTE, screenshot, sync, heads up, expanded desktop, and more)
- Status bar weather
- Enlarge first row, show four tiles per row, show/hide brightness slider
- Heads up notifications
- Show/hide brightness slider
- Advanced location tile
Navigation bar customisation
- Rearrange navigation bar
- Navigation bar height (48/44/40/36/32/28/24/20/0dp)
- Navigation button tint
- Show/hide arrow keys while typing
- Kill app back button
- Double tap navigation bar to sleep
- Navigation ring customisation
- Clear all recents button (enable/disable) and location (top left, top right, top center, bottom left, bottom right, bottom center)
Lock screen customisation
Power menu customization (power off, reboot, screenshot, airplane mode)
- Advanced Reboot (reboot/soft reboot/recovery/bootloader)
Volume rocker customisation:
- Wake device with volume keys when screen off
- Long press volume up/down keys to skip track when screen off
- Volume key adjustment sound (enable/disable)
- Volume key cursor control
Others
- A large number of optimisations and memory leak fixes
- Animated expandable volume panel
- Long press recents to swap back to previous app
- AOSP Gallery2 with material design
- Prevent accidental wake (proximity sensor before waking screen)
Changelog- Chroma Android 5.1.0 series
- Added: Accept all files for incoming files via bluetooth toggle
- Added: SELinux status in about phone
- Added: Show optimising app dialog on first boot
- Added: Volume steps from 15 to 30 (customize ro.config.vc_music_vol_steps in build.prop)
- Fixed: Chainfire's SuperSU 2.46 now properly flashes
- Fixed: Device sleeping with lid with incoming call
- Gallery2: Fix RTL album picking
- Updated: Android is starting, no! Chroma is starting
- Removed: Translation strings in OTACenter
- Updated: Back to 1 T-Mobile APN (you may need to reset your APNs if dirty flashed) to fix IPv6 errors. If you have connectivity problems, switch to IPv4)
- Updated: Optimisations, performance, memory leak fixes, stability patches
If you want to feel similar customisations on your Nexus phones along with Android 5.1.1 build LMY47V, head over to our following installation guide. (Courtesy: Team Android)
Key points
- Before following the installation guide, create backup of all important data of the phone using custom recovery.
- Enable USB Debugging on the phone to connect it with the computer and use Android SDK with it. [Navigate to Settings>> About phone. Tap on Build Number several times until a message appears saying 'You are now a Developer.' Now enable USB Debugging Mode by navigating to Settings>> Developer Options.]
- Your Nexus 4, 5 or, 6 should have above 80% battery charge to avoid power off during the process which could damage the device.
- The phone should be rooted with the latest recovery system installed on it. Also, the bootloader should be unlocked.
- As the Chroma ROM is undergoing development, all the features might not function properly.
- The Android 5.1.1 Chroma ROM works with Nexus 6, 5 and 4. Flashing this on any incorrect variant might brick the device. Verify the model number of the device and flash the file accordingly.
- After flashing the ROM if the device gets stuck on booting animation or experience boot loop then perform wipe cache partition and wipe dalvik cache for a few times before rebooting the device.
- Once the ROM is installed, users are advised to give 10 minutes to the ROM after the device boots up for the first time for better user experience.
Download files
Chroma ROM: Nexus 6, Nexus 5 or, Nexus 4
Gapps
How to update Nexus 4, 5 or, 6 to Chroma ROM featuring Android 5.1.1 build LMY47V
Step-1: Connect the Nexus phone to your PC using USB cable. Without extracting, move the downloaded files to the internal storage of the phone and remember the location
Step-2: Switch off the phone and unplug the USB cable from it
Step-3: Boot your phone into custom recovery. For this press ad hold Volume Up, Volume Down and Power buttons together. Release all the buttons when you see Bootloader/fastboot menu.
You will also see the Start button on the screen, press Volume Down or Up until the start text changes to Recovery Mode. Press the Power button to confirm entering into Recovery mode
Step-4: In recovery mode, perform a Nandroid backup by selecting backup and restore then backup again
Step-5: Perform data wipe by selecting wipe data/factory reset. Use the Power button to select everything in the Recovery mode
Step-6: Perform a cache wipe by selecting wipe cache partition
Step-7: Perform a wipe of your dalvik cache to avoid boot loops or, any other errors. From recovery go to advanced>> wipe dalvik cache
Step-8: Return to the main recovery menu and select install zip from sdcard>> choose zip from sdcard. Browse to the location where you have saved the Chroma ROM, select it and confirm installation
Step-9: Once you have flashed the ROM, follow the similar steps to install Gapps package
Step-10: When you have installed all the files, boot the phone into normal mode by selecting reboot system now. Keep in mind that the first boot will take some time before it loads all the new files.
Your Nexus 6/5/4 should now be up and running on Chroma ROM featuring Android 5.1.1 build LMY47V.
© Copyright IBTimes 2025. All rights reserved.
- MOST READ


