Update Galaxy S3 I9300 to Android 4.3.1 with CyanogenMod 10.2 Unofficial Build [GUIDE]
XDA Developers release first Android 4.3.1 custom firmware via CyanogenMod 10.2 unofficial build

Samsung Galaxy S3 I9300 is among the few lucky Android devices to receive the latest Jelly Bean firmware, thanks to the release of Android 4.3.1 via unofficial build of CyanogenMod 10.2 ROM (CM10.2) by XDA developers. The Android 4.3.1 CM10.2 release also brings a host of feature enhancements and bug-fixes over its previous release for Android 4.3.
As this is an unofficial build, it may harbour a few untested bugs or broken features. As the developer notes, any such issues will be fixed in the upcoming CM10.2 updates.
The CM10.2 unofficial ROM is similar to a nightly build, but it adds some extra goodies hand-picked from popular custom ROMs such as SlimROM, AOKP, ParanoidAndroid and CarbonROM.
Those who wish to update their Galaxy S3 to the latest Android 4.3.1 Jelly Bean firmware can follow our step-by-step guide to install the same via new unofficial build of CyanogenMod 10.2 ROM from XDA developers. IBTimes UK reminds its readers that it will not be held liable for any device damage during or after the firmware installation. Users are advised to proceed at their own risk.
Key Points to Note
- The CyanogenMod 10.2 Unofficial Build and instructions provided in this guide are meant for Samsung Galaxy S3 GT-I9300 model only. Do not attempt installing the firmware on any other model, as you might end up bricking the device.
- Ensure the device is factory unlocked and rooted with ClockworkMod (CWM) recovery or TWRP installed on it.
- Back up important data and settings on the phone via one of the custom recovery tools such as CWM or TWRP to prevent data loss during firmware installation.
- Ensure the device has at least 80% battery charge to prevent unexpected device shutdown (due to battery drain) during firmware installation.
- Enable USB Debugging mode by navigating to Settings > Developer Options (if phone is running Android 4.0 or later) or go to Settings > Applications > Development (if running Android 2.3 or earlier). If the device is running Android 4.2, then perform the following steps:
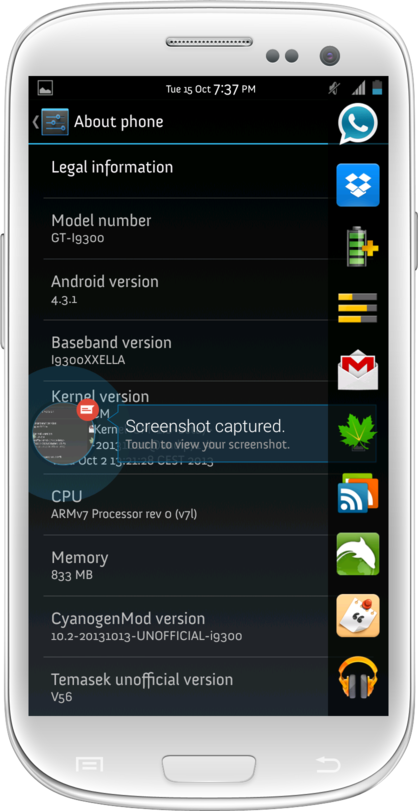
- Go to Settings > About Phone
- Scroll down to the bottom of the screen and select Build Number
- Tap Build number seven times to unlock or reveal hidden Developer Options. Now, select the checkbox to enable USB Debugging mode under Settings > Developer Options.
- Perform a Dalvik Cache wipe before continuing from recovery mode.
- Samsung KIES will not recognize your phone after installing this ROM, as it is a custom ROM.
How to Update Galaxy S3 I9300 to Android 4.3.1 with CyanogenMod 10.2 Unofficial Build
- Download Android 4.3.1 CyanogenMod 10.2 Unofficial Build and Google Apps package for Galaxy S3 I9300 on computer.
- Connect the phone to computer with original USB cable and copy the downloaded CyanogenMod 10.2 Unofficial Build and Google Apps zip files to the root folder on the phone's SD card.
- Power off the phone, disconnect its USB cable and boot it into Recovery mode. To do so, press and hold Volume Up and Home buttons together and then simultaneously tap the Power button until the green robot icon with a triangle appears on the screen. This confirms entry into Recovery mode.
- Before flashing the new ROM do the following steps in CWM recovery:
> wipe data/factory reset
> wipe cache partition
> go to "advanced" and perform wipe dalvik cache
> go to "mounts and storage" and format system
- In CWM recovery, click Install Zip from SD card and select the ROM zip file copied earlier to the phone's SD card (repeat this step for installing Google Apps as well). After selecting the ROM file, allow the ROM to be installed on the device. This process may take about five minutes to complete.
- After the device is updated, hit Reboot System Now to reboot the phone into the newly installed ROM.
Android 4.3.1 based CyanogenMod 10.2 Unofficial Build is now successfully installed on your Galaxy S3 I9300. Go to Settings > About Phone to verify the firmware version installed.
[Source: XDA Developers]
© Copyright IBTimes 2025. All rights reserved.
- MOST POPULAR IN Technology