

How to Install (Stock Android 4.2.2) HTC One Google Play Edition on HTC One M7 [GUIDE]
Stock Android 4.2.2 HTC One Google Play Edition ROM released for HTC One (M7).
Announced at Google's I/O developer conference, the Google Play Editions of Samsung Galaxy S4 and HTC One have recently entered the smartphone market.
Followed by the market rollout, senior XDA member, bigxie, has released a ROM, featuring the stock Android 4.2.2 Google Play Edition for the HTC One codenamed M7. The ROM is made from the system dump of Google Play Edition of HTC One. Besides, the custom build is rooted, odexed and comes with Busybox pre-installed.
Stock Android 4.2.2 ROM (for HTC One M7) details
Made from system dump of Google Play Edition HTC One
Rooted with Koush's superuser app and binary
Latest busybox installed
Odexed
Stock Android 4.2.2 Google Play Edition features
Stock Android 4.2.2 with Google Apps
New Camera UI with improved thumb controls
Wi-Fi and BT are working
Beats Audio toggle in sound settings
Tbalden 4.2.2 kernel (with logo2menu, sweep2wake, use Trickstermod to configure)
Head over to the development thread to learn more about the Google Play Edition ROM.
HTC One users who wish to experience the stock Android 4.2.2 from the HTC One Google Play Edition may follow our step-by-step guide.
IBTimes UK reminds its readers that it will not be held liable for any damage to the device. Additionally, users are also advised to verify that their handsets meet following requirements. The stock Android 4.2.2 Google Play Edition ROM works on GSM version of HTC One with code number m7ul, m7tmo and m7att.
Pre-requisites
1) Install USB Drivers for HTC One to transfer files between the Android device and computer.
2) Enable USB Debugging Mode on the phone to connect it with the computer and use Android SDK with it. [Press Menu>> Settings>> Applications. From there navigate and click on Development option and then check the USB Debugging Mode.]
3) As the tutorial is likely to wipe out all data of the phone, create a backup. If the device is having any custom recoveries such as ClockworkMod/TWRP already installed then backup data using the recovery.
4) The HTC One should have above 80 per cent of battery charge.
5) The phone should be rooted and have ClockworkMod (CWM) recovery installed. Click here for a step-by-step guide to root and install CWM recovery on HTC One. The ROM can be installed via TWRP mode as well.
6) The stock Android 4.2.2 Google Play Edition ROM works only on HTC One (m7ul/m7tmo/m7att). As flashing this on any incorrect variant might brick the device, verify the model of the device.
7) After flashing the ROM if the device gets stuck at Booting animation or experiences boot loop, then perform wipe cache partition and wipe dalvik cache five more times and then reboot the device.
8) Users are advised to give five to 10 minutes to the ROM once the device boots up for the first time to settle everything for a better user experience.
Steps to install stock Android 4.2.2 Google Play Edition on HTC One M7
Step-1: Download Android 4.2.2 Google Play Edition ROM for HTC One to the computer
File name: bigxie_m7_GPe_odexed_tbalden.zip
Step-2: Connect the HTC One to the computer using USB cable. Now copy the downloaded ROM zip to the SD card of the phone. But do not extract any file
Step-3: Disconnect the phone from the computer and turn it off. Wait for about five to six seconds for the vibration to confirm complete power off
Step-4: Boot the HTC One into recovery mode. Press and hold Volume Down and Power buttons together until screen flashes. Now from the HBOOT menu, navigate to RECOVERY option using the Volume Down button and select it using the Power button
Note: In recovery mode use the Volume buttons to scroll between options and Power button to select the desired option.
Step-5: In recovery mode, perform a Nandroid backup of the existing ROM which can be restored later if the new ROM does not work or in case users wish to go back to the previous firmware. To perform a Nandroid backup, select Backup and Restore then on the next screen select Backup again. Go back to the main recovery menu once the backup process is done
Step-6: Perform data wiping task to eliminate clash between the new ROM and the previous ROM. To do so, select wipe data/factory reset then select Yes on the next screen to confirm the action. Wait for few minutes until data wiping is done and then return to the CWM recovery menu. Select wipe cache partition and after wiping cache partition is completed, select Wipe Dalvik Cache under advance option to perform Dalvik cache wiping. Once the action is completed, go back to the recovery menu
Step-7: Select install zip from sdcard and then select choose zip from sdcard. Now navigate to Android 4.2.2 Google Play Edition ROM earlier copied to the SD card of the phone. Select it using the Power button and confirm installation on the next screen. The installation should now begin
Step-8: When the installation process is completed, return to the main recovery menu and reboot the phone by selecting reboot system now. The phone will reboot now and boot up into the customised Google Play Edition ROM. The first boot will take about five minutes
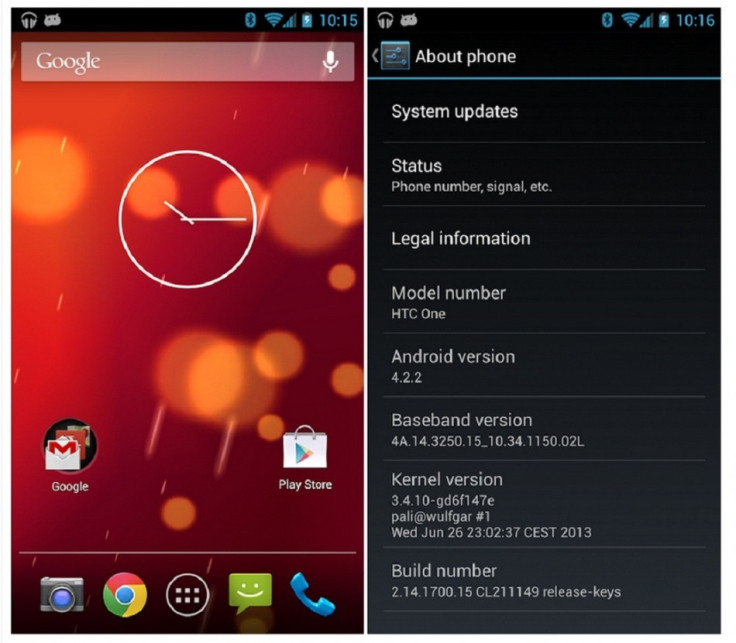
The stock Android 4.2.2 Jelly Bean firmware from HTC One Google Play Edition should be now installed and running on HTC One. Head over to Settings>> About phone to verify the new software of the device.
Note: To go back to the previous ROM, boot the phone into recovery mode, select Backup and Restore then restore the ROM by selecting it from the list.
Also read: update HTC One to Android 4.3 with CyanogenMod 10.2 unofficial build
[Source: Android Geeks]
© Copyright IBTimes 2025. All rights reserved.
- MOST READ


